























A polo shirt can look excellent on the first day and still fail a uniform program after three laundry cycles. When buyers ask how to evaluate embroidery quality, the real question is whether the logo will remain sharp, correctly positioned, and consistent across every garment in the order. For branded uniforms, embroidery is not just decoration. It is a visible test of supplier capability and brand control.
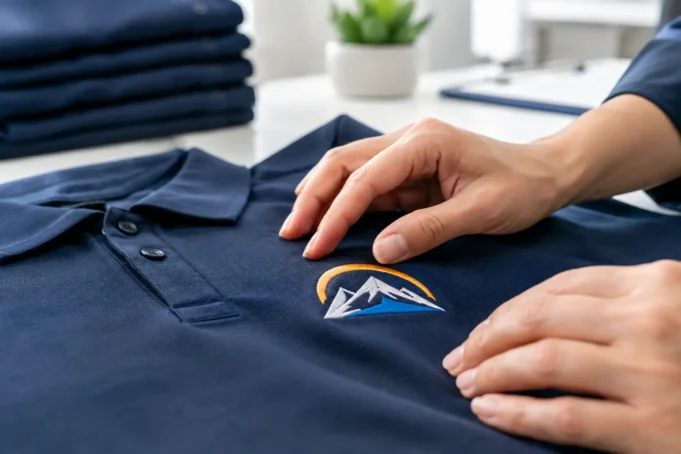
A good evaluation starts before bulk production, with a physical sewn sample on the actual garment fabric. A clean logo file and an attractive digital mockup are useful, but neither can show how thread, backing, garment stretch, and machine settings will behave together.
Start With the Logo’s Overall Appearance
Look at the embroidery from arm’s length first, then inspect it closely. From a normal viewing distance, the design should read immediately. Lettering should be legible, colors should be true to the approved brand reference, and the logo should sit flat without obvious puckering or distortion.
At close range, assess whether the shapes are clean. Curves should be smooth rather than angular, borders should follow the intended artwork, and small details should not disappear into a mass of thread. If the logo includes fine lettering, ask the supplier what minimum letter height they recommend for embroidery. A detail that works in a vector file may be too small to stitch reliably on a chest logo, cap, or sleeve.
Registration matters just as much. This means each thread color and design element lands in the correct position. Misregistration can show up as a border that drifts away from the fill area, a gap between colors, or lettering that looks uneven. On corporate uniforms, these faults are especially visible when staff stand together at a reception desk, retail floor, or event.
How to Evaluate Embroidery Quality in the Stitching
Stitch density is often treated as the main sign of quality, but more stitches do not automatically produce a better result. A dense design can look rich and opaque, yet excessive density can make the embroidery stiff, heavy, and prone to puckering. It can also pull lightweight polo knits out of shape.
The right density depends on the design, thread type, and fabric. On a stable woven work shirt, a filled logo may support more density than it would on a soft performance polo. The objective is full, even coverage without gaps, exposed backing, or a board-like patch of thread.
Check stitch tension by looking for loops, loose thread ends, or thread pulled so tightly that it sinks into the fabric. The front should appear smooth and controlled. On the reverse side, the stitching should be tidy, with no long unsecured thread runs that can snag during wear or laundering.
Pay close attention to satin stitches, commonly used for letters and borders. They should lie evenly across the shape, with consistent width and a clean edge. Fill stitches should cover broad areas without thin spots. If a supplier has used compensating stitches to maintain the intended shape on knit fabric, that is generally a good sign of experienced digitizing rather than a flaw.
Check the Garment, Backing, and Placement Together
Embroidery quality cannot be separated from garment quality. A technically good logo can still perform poorly if the backing is wrong for the fabric. Cut-away backing is often suitable for stretch fabrics because it continues to support the stitches after trimming. Tear-away backing may be appropriate for stable woven garments, but it can leave insufficient support on certain knits.
Turn the sample inside out. The backing should be trimmed neatly, cover the embroidered area adequately, and not create an uncomfortable or abrasive surface. This is particularly relevant for uniforms worn for long shifts, such as hospitality, healthcare, retail, and security apparel. For sensitive areas or lightweight garments, a soft cover layer may be needed over the reverse side of the embroidery.
Placement should be measured, not judged by eye. Confirm the distance from the collar, placket, pocket, center front, or sleeve seam. A logo can appear correctly placed on a medium sample but sit too high or too close to the placket on smaller sizes. Ask how placement will be controlled across the full size range, especially when ordering both women’s and men’s cuts.
Approve a Sewn Sample, Not Just a Digital Proof
A digital proof confirms artwork layout, thread colors, and approximate position. A sewn sample confirms production reality. For any meaningful uniform order, require approval of a physical pre-production sample using the final garment style, final logo size, and intended embroidery location.
The sample review should include a practical wear and wash assessment. Run your hand over the front and back. Does the embroidery feel excessively rigid? Does the garment pull around the logo when stretched naturally? After washing, check whether the thread remains colorfast, the backing stays stable, and the edges remain flat.
For repeat programs, retain the approved sample as a control reference. It gives procurement teams and the embroidery supplier a shared standard when reordering uniforms months later. This is particularly valuable when employee onboarding, branch openings, or seasonal staffing creates smaller repeat orders rather than one large production run.
Before authorizing bulk production, document these approval points:
- Correct logo version, thread colors, and design dimensions
- Clean lettering, edges, color registration, and stitch coverage
- Appropriate backing and acceptable comfort against the wearer
- Measured placement for each garment style and size range
- Wash-tested performance and an approved physical sample reference
Ask the Supplier About Digitizing and Production Controls
A logo file is not automatically an embroidery-ready file. The supplier or embroidery specialist must digitize the design, translating artwork into machine stitch instructions. Strong digitizing accounts for stitch direction, underlay, pull compensation, sequence, and fabric behavior. Weak digitizing often causes lettering to close up, circles to become oval, and fabric to pucker.
Ask whether the supplier will create a new digitized file for the specific application. A design used on a structured cap may need different settings from the same design on a stretch polo. Also ask who reviews the first sew-out, how thread colors are matched, and whether production operators work from an approved sample.
For larger orders, request clarity on machine capacity and batch controls. Multi-head embroidery equipment supports scale, but consistency still depends on maintenance, hooping technique, thread handling, and operator inspection. A capable uniform supplier should be able to explain how it checks placement, trims loose threads, and separates approved goods from rejects before packing.
Match the Decoration Method to the Uniform’s Job
Embroidery is durable and premium-looking, but it is not the best answer for every logo or garment. Large solid designs can make a lightweight shirt uncomfortable. Very fine gradients, photographic effects, and tiny detail may reproduce more accurately through screen printing, heat transfer, or another decoration method.
For uniforms, the decision should reflect the garment’s use. Embroidery is often a strong fit for polo shirts, woven shirts, outerwear, caps, and corporate workwear where a textured, long-lasting logo supports a professional presentation. For activewear, large back graphics, or intricate multicolor artwork, another method may provide better comfort, detail, or cost efficiency.
Evaluate Consistency Before You Commit
The best single sample is only the start. If the order covers multiple colors, fabrics, branches, or uniform categories, review samples for the combinations that matter most. Navy polos, white shirts, fleece jackets, and caps may require different backing, thread contrast, and digitizing adjustments.
Build embroidery quality into your purchase specification rather than leaving it as an informal expectation. Define the approved logo dimensions, placement measurements, garment styles, thread color references, sample sign-off process, and tolerance for minor variation. This turns a subjective visual decision into a manageable production standard.
A uniform logo earns trust through repetition. When every employee receives embroidery that is clean, comfortable, and consistent with the approved sample, the organization presents a more controlled brand image before anyone says a word.